Every smooth finish starts with the right surface preparation, and that’s where sandblasting comes in. Whether you’re restoring a car, prepping metal panels, or cleaning signage before a fresh coat of paint, knowing how to sandblast correctly makes all the difference. When done right, sandblasting efficiently removes rust, paint, and surface residue. It leaves behind a clean, smooth foundation that’s ready for coatings or spray painting.
This guide explains everything you need to know about how to sandblast. It covers the tools, media, setup, and safety tips required to achieve professional results at home or on-site. You’ll learn how to choose the right blasting material for your project, control air pressure for a smooth finish, and avoid common mistakes that cause surface damage. Each section is designed to help you work more efficiently and safely. By the end, you’ll have the confidence to handle your next sandblasting job like a pro.

What Is Sandblasting?
Sandblasting, also called abrasive blasting, is a process that uses compressed air to propel blasting material at high speed onto a surface. The goal is to clean, etch, or smooth the material. The process can strip away old paint, remove rust, and even restore delicate finishes.
The technique works by connecting an air compressor to a sandblaster pot or tank, which pushes air through a hose and nozzle. Inside, blasting material, such as glass beads, soda, or aluminum oxide, is mixed with air flow and directed at the surface. The impact removes unwanted layers while leaving the base intact.
Sandblasting is widely used in:
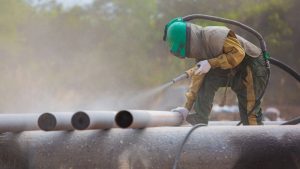
- Automotive restoration: cleaning car body panels, frames, and wheels
- Signage and metalwork: removing paint or oxidation
- Construction: prepping concrete and steel before coating
- Marine work: clearing corrosion from boats and parts
Tools and Equipment You’ll Need
Before starting, make sure you have the right setup. Even small mistakes in air supply or equipment choice can affect the quality of the finish.
Essential Tools
- Air Compressor – Provides the pressure needed to propel the blasting media. Choose one that matches your nozzle size and maintains a steady air flow.
- Blast Pot or Tank – The main container that holds the abrasive material.
- Blast Cabinet – Ideal for small projects or confined spaces where cleanup and containment matter.
- Nozzle and Hose – The nozzle size determines air speed and precision.
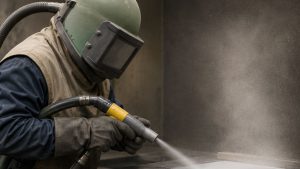
- Protective Gear – Always wear gloves, a respirator, a face shield, and coveralls for full protection from dust and residue.
If you’re sandblasting in your garage, make sure the area is well-ventilated, grounded, and free from loose materials. If you’re unsure about air flow or compressor requirements, consult professionals like CARV before beginning large-scale projects.

Choosing the Right Blasting Media
Your choice of blasting media determines the surface texture, finish, and speed of the process. The wrong choice can damage material or cause uneven cleaning.
Common Types of Media
| Media Type | Best For | Pros | Cons |
| Sand | Concrete, stone | Affordable | Creates dust, health risk (silica) |
| Aluminum Oxide | Metal, auto parts | Fast, durable | Can wear equipment |
| Glass Beads | Stainless, signage | Smooth, bright finish | Slower material removal |
| Soda | Wood, delicate surfaces | Non-abrasive, eco-friendly | Not reusable |
| Steel Grit/Shot | Rusted steel, machinery | Heavy-duty cleaning | Requires high air pressure |
Step-by-Step Guide: How to Sandblast Safely and Effectively
Here’s a detailed breakdown of how to sandblast correctly, from setup to cleanup.
Step 1: Prepare Your Workspace
Work in a well-ventilated area with tarps or barriers to contain dust. Clear away tools and flammable materials. Keep electrical plugs and cords off the ground. Wear full protection, including a respirator, gloves, face shield, and coveralls. A clean setup helps reduce dust and speeds up cleanup.
Step 2: Set Up Your Equipment
Connect your air compressor to the sandblaster using a durable hose and check for steady air flow between 70–100 PSI. Fill the blast pot or hopper with your chosen media, such as glass beads or soda. Secure all fittings tightly and inspect for any air leaks. If working indoors, use a blast cabinet to contain dust and protect nearby surfaces.
Step 3: Test Before Blasting
Before blasting your main surface, test the setup on a small scrap piece. Adjust the air pressure to balance cleaning power and control. Keep the nozzle 8–12 inches away and move in steady, sweeping motions to avoid heat buildup or uneven edges. Work methodically without lingering in one spot. If you notice too much dust or weak performance, check air flow or replace worn nozzles.
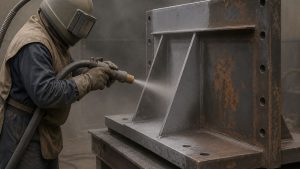
Step 4: Begin Blasting
Start with slow, consistent passes, maintaining a steady distance and smooth motion across the surface. Work from one edge to the other in even strokes. Use lower pressure when blasting thin body panels to avoid warping. In confined spaces, reduce PSI and use a smaller nozzle for better control. For curved or detailed areas, move the nozzle in short, circular motions to prevent cutting and reduce heat buildup.
Step 5: Clean and Inspect
Once you finish blasting, use compressed air or a clean rag to remove dust and residue. Wipe the surface with a degreaser if you plan to spray paint afterward. Check for smoothness by running your hand over the area to spot any missed sections. The surface should feel clean, slightly rough, and ready for coating.
Common Sandblasting Mistakes to Avoid
Even experienced DIYers make mistakes when sandblasting. The most common include using the wrong media, applying too much pressure, or skipping essential protective gear. Always match abrasive hardness to the surface type and maintain proper PSI to avoid warping thin panels or edges.
Another frequent issue is poor cleanup and moisture buildup. Leftover abrasive can ruin paint adhesion, while moisture in the compressor tank can cause clogs or rust. Keep your equipment dry and take your time; slow and steady work produces cleaner, safer, and more consistent results.
Safety Tips and Protection
Safety should always come first in any sandblasting job. Follow these essentials:
- Wear a respirator, face shield, and gloves every time.
- Keep your air hose and compressor connections secure and grounded.
- Never work in confined spaces without ventilation.
- Avoid pointing the nozzle at yourself or others.
- Keep a fire extinguisher nearby; fine dust can be combustible.
- Use hearing protection if your equipment produces high noise levels.
Cleanup, Recycling, and Disposal
Recent studies have explored innovative ways to recycle sandblasting waste instead of sending it to landfills. According to a 2024 study published in PubMed, sandblasting waste, especially from ship maintenance, contains high levels of silica and is classified as hazardous if not handled correctly. However, when chemically and mechanically treated, Pulverized Sandblasting Waste (PSW) can be repurposed as an additive in concrete mortars. The research found that incorporating up to 5% PSW by cement weight improved both compressive and flexural strength while reducing porosity and water absorption. These findings highlight the potential of reusing sandblasting by-products to enhance construction materials and reduce environmental impact.
Post-Job Cleanup and Waste Management
Proper cleanup after each sandblasting job not only extends the life of your tools but also helps protect the environment.
- Collect residual abrasive materials using a broom or industrial vacuum.
- Recycle reusable media such as glass beads or aluminum oxide up to five times to minimize waste.
- Dispose of sand or soda blasting residue safely; never wash it into drains or waterways.
- Wipe down your blast pot, nozzle, and hoses with a dry cloth to prevent corrosion and buildup.
- Store your equipment properly in a clean, dry place to keep it in good working condition for future use.
When to Hire a Professional
DIY sandblasting works well for small projects, but larger jobs like vehicles, metal signs, or architectural panels need professional equipment and experience. Professionals, like CARV, use industrial-grade compressors to maintain consistent air pressure and work efficiently without damaging delicate surfaces.
They also manage safety protection, handle cleanup, and deliver a smooth, uniform finish. If you want flawless results, especially for signage or restoration, it’s often more cost-effective and time-saving to hire experts who can ensure precision and durability.
Other Services Offered by CARV
Beyond professional sandblasting, CARV provides a full range of premium signage solutions that combine craftsmanship and durability:
- Wholesale Sandblasted Cedar Signs: Made from high-quality western red cedar, these signs are ideal for businesses seeking a rustic, natural look with long-lasting appeal.
- Sandblasted HDU Signs: Lightweight, weather-resistant, and perfect for intricate designs that mimic wood without the maintenance.
- Channel Routed Specialty Signs: Precision-routed designs that offer a clean, dimensional finish suited for custom branding and architectural features.
Each product is crafted with precision and finished for lasting performance in any environment. Whether you’re ordering one sign or a full batch, CARV ensures quality, consistency, and a design that stands out.
Conclusion
Knowing how to sandblast gives you greater control over the quality of your restoration or surface preparation projects. While the process can be learned, mastering it requires time, the right tools, and experience to achieve a smooth, consistent finish without damage.
At CARV, we specialize in professional sandblasting and surface preparation using advanced equipment and eco-friendly materials. Whether you’re restoring a sign, cleaning metal surfaces, or prepping for a new paint job, our team delivers precision, safety, and lasting results. Contact us today to learn how our sandblasting services can bring new life to your surfaces.
FAQs
How to use a sandblaster?
To use a sandblaster, connect it to a reliable air compressor and fill the blast pot with your chosen abrasive media. Hold the nozzle about 8–12 inches from the surface and move it steadily in sweeping motions. Always wear proper safety gear, including a respirator and face shield, to protect yourself from dust and debris.
Can you do sandblasting yourself?
Yes, you can do sand blasting yourself for small projects like cleaning metal parts or removing rust. However, it requires careful setup, proper air pressure control, and protective equipment to ensure safety. For large or delicate jobs, it’s best to hire professionals who have the right tools and experience.
What is needed to do sandblasting?
To do sandblasting, you need an air compressor, a blast pot or cabinet, a durable hose, and abrasive media such as glass beads or aluminum oxide. You’ll also need safety gear, including gloves, a respirator, and a face shield. A clean, well-ventilated workspace is essential to control dust and ensure smooth results.
Is sandblasting difficult?
Sandblasting isn’t difficult once you understand the setup and techniques involved. The challenge lies in controlling air pressure and choosing the right media for each surface. With practice and attention to safety, most people can learn to sandblast effectively.