Last Updated: June 4, 2026
Setting up sandblasting equipment correctly helps create cleaner finishes, steadier blasting pressure, and more consistent production results. A proper setup includes the right air compressor, moisture control system, blasting media, hose configuration, and pressure settings. If one part of the system is incorrect, blasting performance quickly becomes uneven.
Whether you are blasting HDU signs, metal, wood, or industrial surfaces, a reliable setup helps reduce clogging, weak airflow, wasted media, and surface damage. This guide explains how to set up sandblasting equipment step by step, including compressor sizing, PSI settings, airflow requirements, moisture control, and common mistakes that affect blasting performance.
What Sandblasting Equipment Actually Does
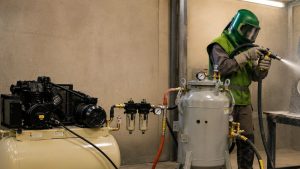
Sandblasting equipment uses compressed air to push abrasive media through a hose and nozzle at high speed. The abrasive hits the surface to remove coatings, clean materials, create texture, or prepare surfaces for finishing.
In sign production, sandblasting is commonly used to create carved depth, add texture to wood and HDU signs, remove coatings, and prepare surfaces for painting or sealing. A properly configured setup helps maintain steady blasting pressure and repeatable results across every project.
Sandblasting Equipment Setup Diagram
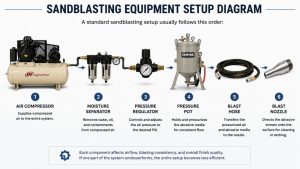
A standard sandblasting setup usually follows this order:
Each component affects airflow, blasting consistency, and overall finish quality. If one part of the system underperforms, the entire setup becomes less efficient.
Complete Equipment Needed for Sandblasting Setup
| Equipment | Purpose |
| Air Compressor | Supplies compressed airflow |
| Pressure Pot | Holds and pressurizes abrasive media |
| Moisture Separator | Removes water from compressed air |
| Pressure Regulator | Controls blasting PSI |
| Blast Hose | Transfers air and media |
| Blast Nozzle | Directs blasting stream |
| Abrasive Media | Cleans or textures the surface |
| Safety Gear | Protects the operator from dust and debris |
How to Set Up Sandblasting Equipment Step by Step
A proper sandblasting setup focuses on stable airflow, dry abrasive media, secure connections, and controlled blasting pressure. Following the correct process helps reduce pressure loss and improve finish consistency.
Step 1: Prepare the Work Area
Choose a clean and controlled work area with good ventilation. Use tarps, blast cabinets, or containment systems to help manage dust and abrasive spread. A stable work environment improves visibility, reduces contamination, and helps protect nearby equipment from blasting debris.
Outdoor blasting setups should avoid excessive humidity whenever possible because moisture creates problems inside the air system and pressure pot.
Step 2: Set Up the Air Compressor
Connect the air compressor and confirm it can deliver enough CFM and PSI for your nozzle size. Many blasting problems happen because the compressor cannot maintain airflow during continuous operation.
| Nozzle Size | Recommended CFM @ 90 PSI |
| 1/8″ | 20–25 CFM |
| 3/16″ | 45–55 CFM |
| 1/4″ | 80–100 CFM |
Larger nozzles require significantly more airflow. If airflow drops during blasting, the abrasive stream becomes weak and inconsistent. Allow the compressor to stabilize before starting production work.
Step 3: Install Moisture Control
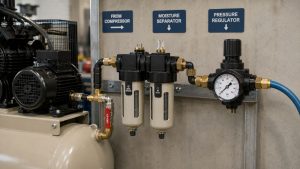
Install a moisture separator and air filter between the compressor and pressure pot. Moisture is one of the most common causes of clogged media, uneven blasting, and pressure fluctuations.
Compressed air naturally creates condensation during operation. Without proper moisture control, abrasive media can clump inside the pot and hose, which disrupts blasting performance and slows production. In humid environments, adding an air dryer may further improve airflow quality.
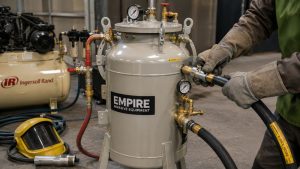
Step 4: Assemble the Pressure Pot
Connect the pressure pot to the air supply and secure all fittings before pressurizing the system. Inspect the air inlet valves, media valves, pressure seals, and hose clamps to make sure everything is tight and properly aligned.
Loose fittings reduce blasting pressure and create inconsistent media flow. Small leaks can quickly lower system efficiency during continuous blasting.
Step 5: Connect Blast Hoses and Nozzle
Attach the blast hose securely to the pressure pot and install the nozzle. Hose diameter should match your airflow requirements because restrictive hoses reduce blasting performance.
Inspect hoses for cracks, soft spots, loose couplings, or excessive wear before use. Damaged hoses not only reduce pressure but can also create unsafe operating conditions.
Step 6: Load Abrasive Media
Fill the pressure pot with clean, dry abrasive media. Avoid mixing media types or using contaminated material because this can disrupt blasting consistency and create uneven finishes.
Consistent media quality helps maintain predictable cutting performance and smoother surface results across larger projects.
Choosing the Right Blasting Media
Different abrasive materials create different cutting speeds, surface textures, and finish quality. The best media depends on the surface material, coating thickness, and the final finish you want to achieve.
Aluminum Oxide
Aluminum oxide is a sharp and aggressive abrasive commonly used for heavy coating removal, rust removal, and industrial surface preparation. It cuts quickly and creates a rougher surface profile, which makes it effective for demanding blasting applications.
Garnet
Garnet offers a balanced combination of cutting power and control. It removes coatings efficiently while maintaining a more controlled finish compared to aluminum oxide. Many operators use garnet for general-purpose blasting and surface preparation work.
Glass Beads
Glass beads create smoother finishes and lighter cleaning action. Instead of aggressively cutting the surface, they peen the material to create a more polished appearance. This makes glass beads useful for polishing, decorative finishes, and lighter surface treatment.
Before starting a full project, testing the media on scrap material helps confirm the finish quality and blasting performance you want.
Step 7: Test Pressure and Media Flow
Before beginning production work, test the system on a scrap surface. Start with lower pressure settings and gradually increase pressure until the desired finish is achieved.
Check the blasting pattern, abrasive flow, compressor stability, and surface texture during testing. Small adjustments to pressure, nozzle distance, and blasting angle often make a major difference in finish consistency.
Airflow vs PSI: What Actually Matters Most?
Many operators focus only on PSI, but airflow is usually the bigger factor in blasting consistency.
- PSI controls blasting force
- CFM controls sustained blasting performance
If airflow is too low:
- Blasting weakens
- Pressure fluctuates
- Surface finishes become uneven
- Productivity slows down
A balanced setup requires both adequate PSI and sufficient CFM.
Research published in the Journal of Materials Research and Technology found that blasting pressure strongly affects surface roughness and hardness, making proper pressure control important for consistent finishing quality.
Recommended PSI for Different Surfaces
| Surface | Typical PSI Range |
| HDU Signs | 40–70 PSI |
| Wood | 50–90 PSI |
| Aluminum | 50–80 PSI |
| Steel | 80–120 PSI |
| Heavy Rust Removal | 100–120 PSI |
Lower pressure is usually safer for softer materials like wood and HDU because excessive PSI can damage edges and surface detail.
Sandblasting Setup for HDU Signs

HDU sign production requires controlled blasting depth and consistent surface texture. Most sign shops use medium blasting pressure, fine abrasive media, and controlled nozzle distance to maintain cleaner carving detail.
For HDU signs, blasting pressure that is too high can damage lettering edges and create uneven depth. Wet abrasive media can also reduce detail quality and create rough surface texture. Many operators maintain a nozzle distance between 6 and 12 inches to achieve smoother, more predictable carving results.
Consistent blasting technique becomes especially important in sign production because uneven depth is more visible on finished lettering and backgrounds.
Common Sandblasting Setup Mistakes
Several setup mistakes reduce blasting efficiency and create inconsistent results.
Using a compressor that is too small is one of the most common issues. An undersized compressor cannot maintain enough airflow during continuous blasting, which causes weak abrasive flow and unstable pressure.
Skipping moisture control also creates major performance problems. Moisture inside the system causes abrasive media to clump, clog hoses, and disrupt blasting consistency.
Dirty or contaminated media reduces cutting performance and creates unpredictable finishes. Loose hose connections can also reduce pressure and waste compressor output during operation.
Another common mistake is skipping test blasting before production work begins. Testing on scrap material helps identify pressure issues, poor media flow, or surface damage before starting the actual project.
Sandblasting Troubleshooting Guide
Even a properly assembled sandblasting setup can develop performance issues during operation. Problems like clogged media, weak blasting pressure, uneven finishes, or unstable airflow often come from small setup mistakes that affect the entire system. Identifying these issues early helps reduce downtime, wasted abrasive media, and inconsistent surface results.
Why Does My Media Keep Clogging?
Media clogging usually points to moisture problems somewhere in the air system. Wet abrasive media, excessive condensation, worn valves, or contaminated pressure pots commonly cause blockage issues.
Improving moisture control often solves most clogging problems quickly.
Why Is My Blast Pattern Weak?
A weak blast pattern usually indicates insufficient airflow somewhere in the system. In many cases, the compressor cannot maintain enough CFM during continuous blasting.
Worn nozzles, air leaks, and undersized hoses can also reduce blasting performance over time.
Why Is the Surface Finish Uneven?
Uneven finishes are often caused by inconsistent nozzle distance, fluctuating airflow, incorrect blasting angle, or unstable media flow. Maintaining steady movement and consistent pressure helps improve finish quality across the entire surface.
Safety Requirements for Sandblasting Setup
Sandblasting creates airborne dust, abrasive particles, and high-pressure hazards. Proper safety equipment should always be part of the setup process.
Operators should wear respiratory protection, eye protection, gloves, hearing protection, and durable clothing while blasting. Proper ventilation also helps reduce airborne dust exposure during operation.
OSHA recommends respiratory protection and ventilation systems when working with abrasive blasting materials to reduce long-term health risks.
Sandblasting Setup Checklist
Use this checklist before starting any blasting project:
- Compressor meets airflow requirements
- The moisture separator is installed
- Hoses and fittings are secure
- Abrasive media is clean and dry
- Pressure settings are tested
- Safety gear is worn
- Test blasting is completed
Using a consistent checklist helps reduce setup errors and improves blasting reliability.
Pro Tips for More Consistent Sandblasting Results
Consistent blasting results usually come from maintaining the same setup conditions across every project. Keep nozzle distance steady, monitor airflow stability, and avoid sudden pressure changes during blasting.
Replacing worn nozzles regularly also helps maintain consistent blasting patterns because nozzle wear gradually reduces system efficiency. Storing abrasive media in sealed, dry containers further improves blasting consistency and reduces clogging issues.
Small setup adjustments often create major improvements in finish quality and production speed.
When Professional Sandblasting Services Make More Sense
Professional sandblasting services are often the better choice for large projects, high-volume production, or precision finishing work. Industrial blasting setups typically include higher-capacity compressors, advanced moisture control systems, and production-grade equipment designed for continuous operation.
Experienced blasting teams can also maintain more consistent finishes while reducing the risk of surface damage, wasted media, or costly rework.
Wholesale HDU Signs for Consistent Production Results
A reliable blasting setup matters, but the material itself also affects final quality. High-density urethane (HDU) remains one of the most reliable materials for sandblasted signage because it provides cleaner carving detail, more consistent blasting depth, and long-term durability.
At CARV, we produce wholesale HDU signs designed for professional blasting and finishing workflows. Our signs are built for clean production results, repeatable quality, and long-term outdoor performance.
If you need production-ready HDU signs for your next project, contact CARV to learn more about our wholesale sign solutions.
Conclusion
Setting up sandblasting equipment correctly helps maintain stable airflow, cleaner blasting patterns, and more consistent surface finishes. A reliable setup includes proper compressor sizing, moisture control, clean abrasive media, secure hose connections, and controlled blasting pressure.
Small setup adjustments often make the biggest difference in blasting consistency, surface quality, and overall production efficiency.
At CARV, we focus on production-ready sign solutions designed for consistency and long-term performance. If you need wholesale HDU signs built for professional finishing workflows, contact our team to discuss your next project.
FAQs
What PSI is best for sandblasting?
Most sandblasting jobs use 70 to 120 PSI, depending on the material and desired finish. Lower pressure works better for softer surfaces like wood, while higher pressure is used for metal or heavy coatings. Starting at a lower PSI and adjusting upward helps you control the result and avoid surface damage.
What size compressor do I need for sandblasting?
The right compressor depends on CFM (airflow), not just PSI. Most setups require at least 20 to 50 CFM for consistent blasting, while larger nozzles may need 50+ CFM. A compressor that cannot maintain airflow will result in weak and uneven performance.
Why is moisture bad in sandblasting?
Moisture in the air causes the blasting media to clump and clog, which disrupts the flow and leads to uneven results. It can also damage equipment and reduce efficiency. Using a moisture separator or air dryer keeps the system running smoothly and consistently.
Can I reuse sandblasting media?
Some blasting media can be reused, while others cannot. Durable media like aluminum oxide and garnet can often be reused multiple times if kept clean and dry. Softer media or contaminated materials should be replaced to maintain consistent blasting quality.